Create A Link To A Point On The Same Page

We all add links to different pages both within our blogs and externally to other sites.But what about creating a link within a page, a link from one point on a page to another.This is something i often see in Help or FAQ pages, a list of the most common questions and you click on the question to jump to the answer.This way of linking within a page is actually very simple and nothing needs to be added to your template for it to work.In this post i will show you how to quickly create a simple link within pages on your blog.But as a bonus i will also show you how some jQuery can make the transition between the link and the point it leads to less of a jump and more of leisurely scroll.

So i guess we need some demo's, the first demo is the basic link.Click Paragraph 1 and you jump to paragraph 1 and so on.You will also see a link to jump to end which brings you to the end of the post.

http://the-test-blog-one.blogspot.com/2011/05/some-text.html

The second demo looks the very same but you will love how the jQuery has added a scroll between the link and the content.

http://test-blog-59.blogspot.com/2011/05/linking-within-pages-with-jquery.html

Linking Within A Page


Creating Basic Links Within A Page On Your Blog


The Point we link to

We will start with the point we want the link to lead to.On the test blog this was a paragraph with a title and i added the following html to each title.

<a name="paragraph1">Paragraph 1</a>

<a name="paragraph2">Paragraph 2</a>

<a name="paragraph3">Paragraph 3</a>

<a name="paragraph4">Paragraph 4</a>

<a name="end"></a>

You will have noticed when you clicked the link to 'End' there was no title as with the paragraphs.You don't need to have text in the section you are linking to.

The links

The actual links users click to jump to these sections are regular hyperlinks like this with the name of the section :

<a href="#paragraph1">Paragraph 1</a>
<a href="#paragraph2">Paragraph 2</a>
<a href="#paragraph3">Paragraph 3</a>
<a href="#paragraph4">Paragraph 4</a>
<a href="#end">End</a>

So when you are creating your links you add the tag to the point linking to, like this :

<a name="UNIQUE-NAME">TITLE</a>

And you add the link like this:

<a href="#UNIQUE-NAME">TITLE</a>

In a FAQ type page it might look like this :

<a href="#answer1">Q - How Much Does It Cost ?</a>

<a name="answer1">A - It's Free !</a>

I think that's fairly basic and with very little effort you are linking within the page.

Adding A jQuery Scroll Effect To The Links


This is a script from Design Shack that lets us make the transition a lot better.

OK the only change to the actual links here is we add div id="linknav" to the links :

<div id="linknav">
<a href="#paragraph1">Paragraph 1</a>
<a href="#paragraph2">Paragraph 2</a>
<a href="#paragraph3">Paragraph 3</a>
<a href="#paragraph4">Paragraph 4</a>
<a href="#end">End</a>
</div>
And we add the following scripts to your blog :

Note - If you have previously added jQuery to your template remove the line in yellow before adding code to your template.

<!--start jquery from http://www.spiceupyourblog.com-->
<script src='http://ajax.googleapis.com/ajax/libs/jquery/1.4/jquery.min.js' type='text/javascript'/>
<script src='http://spiceupyourblogextras.googlecode.com/files/jquery.localscroll-1.2.7-min.js' type='text/javascript'/>
<script src='http://spiceupyourblogextras.googlecode.com/files/jquery.scrollTo-1.4.2-min.js' type='text/javascript'/>
<script type='text/javascript'>
$(document).ready(function() {
$(&#39;#linknav&#39;).localScroll({duration:800});
});
</script>
<!--end jquery from http://www.spiceupyourblog.com-->

On Wordpress or any other platform you add this to the head section of your blog between <head> and </head>, below i have the steps for Blogger.

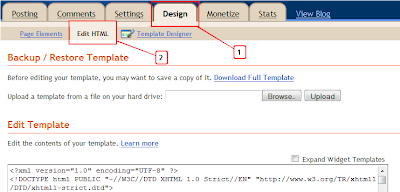
Step 1. In your Blogger Dashboard click Design > Edit Html

Design Edit Html Blogger

Step 2. Find the following piece of code in your blogs Html : (Click Ctrl and F for a search bar to help find the code - More Info)

</head>

Step 3. Copy and Paste the following code directly Above / Before </head>

<script src='http://ajax.googleapis.com/ajax/libs/jquery/1.4/jquery.min.js' type='text/javascript'/>
<script src='http://spiceupyourblogextras.googlecode.com/files/jquery.localscroll-1.2.7-min.js' type='text/javascript'/>
<script src='http://spiceupyourblogextras.googlecode.com/files/jquery.scrollTo-1.4.2-min.js' type='text/javascript'/>
<script type='text/javascript'>
$(document).ready(function() {
$(&#39;#nav&#39;).localScroll({duration:800});
});
</script>

Step 4. Save Your Template.

4 Tips for Writing SEO-Friendly Blog Posts


This post originally appeared on the American Express OPEN Forum, where Mashable regularly contributes articles about leveraging social media and technology in small business. 

In addition to writing for their human readers, web writers and bloggers have to consider the digital web crawlers employed by search engines like Google. Your business can’t skip the task. 

Since most would-be readers use search engines to find blog posts, you need to make sure that Google ranks your site highly when those readers search for terms related to your business and the content you’re writing. 

You could spend thousands of dollars to have a search marketing firm optimize your business’s blog for search engines, but chances are that you can learn a lot of the fundamentals yourself, saving yourself a lot of money as long as you have the interest and the time. Here’s a basic primer on Search Engine Optimization (SEO) for your company’s blog. 
1. Always Include Search Terms in Your Post’s Title 

When Google reads a website to index it, it reads the code directly, not the snazzy presentation that humans see. The way most blogging platforms are built, the headline or title of your blog post is among the first things Google sees, and Google generally assumes the words that appear earliest are the most important. That’s why the title is the most important part of your blog post when it comes to SEO. 

Think about who you want to reach with this blog post, and what that person might be searching for when looking for your business’s goods or services, then include critical words from that hypothetical search in the title. The most important terms should appear as quickly as you can reasonably fit them in. Just be careful not to make the title unreadable or awkward to human readers — that SEO effort will have been for naught if the reader is immediately turned off by the content once he or she finds it. 

Here’s a pro tip: You’re not likely to win strong ranking for more than one or two search terms at once, so minimalism is a virtue here. Don’t get over-ambitious. Focus on one potential search term, then if you want to rank for a second term, write a separate and unique post specifically with it in mind. 
2. Link Important Words to Earlier Blog Posts 

Search engines generally assume that a blog post that has been linked to has more authority than one that has not. They also consider exactly what word or phrase linked to the post; a blog post about the iPhone is going to be more likely to show up in Google searches on the subject if another page links the word “iPhone” to the post. 

You’ll get the most value from external links from sites that Google or other search engines already consider to be an authority of the subject (if the top blog about iPhones links the word to your post, you’ll get a huge boost), but all incoming links will still pass rank to your page, even those from elsewhere on your site. 

So be sure and link important keywords to other pages or previous posts on your blog to gain some credibility and search rank. It will make a big difference. Just don’t overdo it; not only do human readers hate reading blogs so filled with links that they might accidentally click on something, Google may penalize you if you go overboard, too. 
3. Hit the Tagging Sweet Spot 

Most blogging platforms let you apply tags to your posts. Tags help organize your blog so both humans and search engines can find what they’re looking for. They’re terms like “consulting,” “local” or “technology” that reflect the topics and content of the post. 

Google tries to recognize tags and use them to prioritize your site in its search ranking for those terms. The tags are usually links to other pages on your blog (usually a backlog of other posts with the same tag), and like we said earlier, linking search terms to other pages on your site helps too. 

So by all means, add pertinent tags to your blog post, but be warned that Google and other search engines are wary of sites that try to game this system. They will penalize you in the search rankings if you use so many tags that the web indexing bots suspect you might be attempting to associate your content with unrelated topics just to score extra traffic. 

The method for determining this is arcane, but a good rule of thumb from a pro blogger is that five to 10 appropriate tags are usually right in the sweet spot. 
4. Use Google Insights to Find the Best Search Terms 


You don’t have to play a guessing game about the best tags or search terms to link or put in your post’s title. Since Google is the most popular search engine, it makes sense to focus your efforts there. Whenever you’re not sure which terms to go with, hit up Google Insights, a web-based tool that compares the popularity of any search terms you want to know about. 

For example, if your business is a coffee shop but you’re not sure whether would-be customers are more likely to search for “café” or “coffee shop,” Insights can tell you which one is more popular. 

These four tips should get you on your way to having a more SEO-friendly corporate blog. Add your tips for search engine optimization in the comments below.


Partner site : online news

Make your Web page picture perfect with frames

Summary:  Despite the presence of frames in HTML 4.0, Web designers still rely on tables for page layout. However, tables are not as resource efficient as frames and they do not present information as effectively as frames can. Frames minimize unnecessary page reloads, load common parts of your site once, and reduce the amount of page scrolling. Find out the benefits of frames and learn the secret to your pages rendering quickly and efficiently.
Look at the HTML source of many Web pages today and you will find a vast number of tables nested one inside another with various inline colors and fonts defined. Besides adding an unnecessary amount of HTML to a Web page, these tables can make a page difficult to maintain. Further, tables typically require that each Web page on a site contain site navigation and other common pieces of site information, which means that if you want to make changes to these elements on one page, you must make that change on every page.
When you use frames, one frame can contain an HTML file with your site's navigation and a second frame can contain your content. The frame containing the navigation is only loaded into the browser once, and the navigation remains visible when users scroll through your content.
This article shows how to use frames to keep your Web pages clean and efficient. I will explain the use of frames, show you how to plan your Web page to work with frames, walk you through common frame tags, and provide some examples of frames in action.
An introduction to frames
Frames provide an entirely new way of looking at Web pages. HTML frames were first introduced by Netscape. Although the frame tags did not make it into the HTML 3.2 specification (frame tags are in the HTML 4.0 spec), they were supported in Netscape Navigator 2 and in all later versions of Netscape as well as Microsoft Internet Explorer version 3 and higher. And this marks the only limit to using frames: Do not use frames with Web content that will be primarily viewed in old browser versions. However, keep in mind that most Internet users today are either using or have access to Netscape Navigator or Microsoft Internet Explorer 4.x or higher. Often these have been provided with either their operating system or through their Internet service provider.
The best way to explain frames is to look at an example. Figure 1 illustrates a sample Web page that uses four frames. The four frames are:
  1. The header, which contains the blue and black banner.
  2. The footer, which is colored black and contains some standard site information.
  3. The left-hand side navigation area (in blue).
  4. The right-hand side frame (in white) that contains the site's welcome information.
Each of these four frames can be updated without the contents of another frame being affected.
For example, in Figure 1, if you were to click on any of the links in the blue navigation area on the left, the contents in the right frame change to display the appropriate information. However, using frames means that the other three sections do not change and, thus, prevent resources from being spent to reload them. Also, since these frames do not change, when a user scrolls through the content in the right white frame, the information contained in the three remaining frames does not change and is always ready for use.
The same Web page could be designed using tables, but the contents of the header, footer, and navigation area would have to be loaded repeatedly as users go to different parts of the site. Also, since everything would be in one page (and one frame), the navigation and header would likely be scrolled out of view, and if the users do not scroll, they would not see the footer at all.

Figure 1: A sample Web page using frames
Figure 1 
The basics
Some of what I described above, such as clicking on a link in one frame to load content in another frame, may seem a bit mysterious at this point. To explain, let's look at a basic Web page that uses two frames and go over the creation of a frameset.
Whenever you see frames in a Web site there are many HTML files being used. There is always one HTML file for each frame as well as an HTML file defining the layout of the frames. For example, FIgure 2 is made up of three HTML files: framessample1.html (this is the frames file that manages the layout of the two remaining files), bannerfile.html, and contentfile.html.

Figure 2: A sample Web page using frames
Figure 2 
Minimal planning needs to be done when creating just two frames. You need two HTML files for the source of each frame. You also need to choose the size of the two frames, and decide whether you want to split the screen horizontally or vertically. The HTML in Listing 1 was used to create the frames shown in Figure 2.

Listing 1. Sample two frame HTML file
                

<html>

<head>

<title>Sample two frame HTML file</title>

</head>

<frameset rows="18%,82%">

      <frame src="bannerfile.html">

      <frame src="contentfile.html">

<noframes>Netscape Navigator 2 or higher and Microsoft Internet Explorer
3 or higher is

required to view frames.</noframes>

</frameset>

</html>
 

The best way to explain the HTML used to create the two-frame Web page shown in Figure 2 is to look at each tag individually. These tags are the minimum required to create frames. (See the section Customize your frames, found later in the paper, for additional frame attributes.)
1. <html>...</html>
Use the <html> tags as you would with any HTML file.
2. <head>...</head>
Use the <head> tags as you would with any HTML file. It is not necessary to add style or reference a cascading style sheet because there is no content to format.
3. <title>...</title>
The title you enter in the frames file is the one that appears in the caption at the top of the browser window. The title in each frame's HTML file does not appear while displayed within frames.
4. <body>...</body> and other formatting tags and links
Use of the <frameset> tag in an HTML file means that you cannot include a <body> tag, any other formatting tags, or links outside of the tags described here.
5. <frameset>...</frameset>
Creates a set of frames that are laid out based on the rows and cols attributes you define. When you define a <frameset> tag you must also include one of two sizing attributes (rows or cols) as part of the tag.
  • rows="percent, pixels, or *" attribute The rows attribute splits the browser window into horizontal frames. The height of these frames is defined by row height values separated by commas. You can define the row height in one of three ways: in pixels, as a percentage of the total height of the frameset, or with an asterisk (*), using as much remaining space as possible.
    For example, in Listing 1, <frameset rows="18%, 82%"> splits the frameset horizontally with the top frame taking up 18% of the browser window and the second frame occupying the remaining 82%.
  • cols="percent, pixels, or *" attribute The cols attribute splits the browser window into vertical frames. The width of these frames is defined by column width values separated by commas. You can define the column width in one of three ways: in pixels, as a percentage of the total width of the frameset, or with an asterisk (*), using as much remaining space as possible.
    For example, see Listing 3, <frameset cols="25%, 75%"> splits the frameset vertically with the first column taking up 25% of the browser window and the second column occupying the remaining 75%.
  • Another rows and cols example It is also acceptable to mix units, for example, <frameset rows="50,50%,*">. This creates a window with three frames. The first frame is 50 pixels, the second frame is 50% of the screen, and the third uses the rest of the space on the screen.
6. <frame>
Used to define the Web page to display in each frame. When you define a <frame> tag you must also include the src attribute as part of the tag.
  • src="source URL" attribute This attribute is required to define the file to display in each frame.
    Usage example: <frame src="filename.html">
7. <noframes>...</noframes>
Allows you to enter text that is displayed if your frames file is loaded into a Web browser that does not support frames.
Nested framesets
Now that we have covered some basic frame tags and layout, let's go over some more complex frame layouts. Figure 3 uses frames that go in more than one direction, not just columns or rows. When designing a layout like this, it is helpful to have a clear idea of how you want your frames layed out. In this case, you need three HTML files for the source of each frame and, of course, an HTML file to define the frames.

Figure 3: Sample three-frame Web page
Figure 3 
To make this Web page, start by creating one frameset containing two horizontal frames or rows, similar to the Web page shown in Figure 2. Then you'll need to split the bottom frame vertically, creating two columns. To create the two vertical frames, another frameset must be created within the first one. Listing 2 shows the code that was used to create the two-frame Web page in Figure 2 with the additional code needed to add the second frameset added. The changes are in bold.

Listing 2. Sample three-frame HTML file
                

<html>

<head>

<title>Sample three frame HTML file</title>

</head>

<frameset rows="18%,82%">

   <frame src="bannerfile.html">

   <frameset cols="25%,75%">

      <frame src="navigationfile.html">

      <frame src="contentfile.html">

   </frameset>

<noframes>Netscape Navigator 2 or higher and Microsoft Internet Explorer
3 or higher is

required to view frames.</noframes>

</frameset>

</html>

Naming your frames
Earlier I explained that if you were to click any of the links in the navigation frame in Figure 1, only the material in the content frame changes and the material found in the header, navigation, and footer frames remains unchanged. This is accomplished by giving each frame a name.
The name attribute is an identifier for the frame. A frame's name is used as a link's target, telling the browser where to display the page. Listing 3 shows the sample code that was used to create the three-frame Web page above with the name attribute added to each frame tag. The changes are in bold.

Listing 3. Sample three-frame HTML file containing the name attribute
                

<html>

<head>

<title>Sample three frame HTML file</title>

</head>

<frameset rows="18%,82%">

   <frame src="bannerfile.html" name="banner">

   <frameset cols="25%,75%">

      <frame src="navigationfile.html"
name="nav">

      <frame src="contentfile.html"
name="content">

   </frameset>

<noframes>Netscape Navigator 2 or higher and Microsoft Internet Explorer
3 or higher is

required to view frames.</noframes>

</frameset>

</html>

The name and target attributes are described in greater detail below.
1. name="framename" attribute
Each frame can have a name but it is not required. The name attribute is an identifier for the frame. It allows you to define a specific frame in which a page can be loaded. Usage example: <frame src="filename.html" name="name">
2. target="framename" attribute
Use the link attribute "target" to define where you want the browser to display a page. A frame or window name is used as the value of the target. A typical use of the target attribute is to have a list of links in one frame and have the linked pages open in the defined target or window.
For example, an HTML page in the "nav" frame contains a link to another page that you want to open in the "content" frame. When the link is clicked in the "nav" frame, the "content"frame file changes. Usage example: <a href="newpage.html" target="content">New page</a>
Similarly, if you do not want a page to load in or replace your frameset, define the link target as "_blank";. This will open another instance of the browser and load the page there. Usage example: <a href="http://www.ibm.com" target="_blank">IBM</a>
Customize your frames
There are additional frame and frameset attributes that can be used to further customize each frame's appearance and function. Compare Figure 4 with Figure 3 and you'll see that the frame borders are gone, there is no longer a scroll bar in the banner, and the document in the content frame has increased margins between the document and the edges of the frame. Listing 4(additional attributes are in bold) shows the code used to create the frames shown in Figure 4.

Figure 4: Sample three-frame Web page using additional attributes
Figure 4 

Listing 4. Sample three-frame HTML file with additional attributes
                

<html>

<head>

<title>Sample three frame HTML file</title>

</head>

<frameset rows="18%,82%" frameborder="no">

   <frame src="bannerfile.html" name="banner"
scrolling="no">

   <frameset cols="25%,75%">

      <frame src="navigationfile.html"
name="nav" noresize>

      <frame src="contentfile.html"
name="content" marginheight="50" marginwidth="50">

   </frameset>

<noframes>Netscape Navigator 2 or higher and Microsoft Internet Explorer
3 or higher is

required to view frames.</noframes>

</frameset>

</html>

Using the attributes, you can control the appearance of the frameset by removing the raised borders between the frames. You can control the scrolling and resizing for each individual frame, as well as the margins around each frame's HTML source.
1. frameborder="yes or no" attribute
Defines whether the frameborder is visible or not. Typically the browser default for frameborders is yes, so if you want frameborders you do not need to use this attribute. Usage example: <frameset rows="50%, 50%" frameborder="no">
2. scrolling="yes, no, or auto" attribute
You can control whether you want the user to be able to scroll the frame. Typically the browser default for scrolling is either yes or auto. Usage example: <frame src="filename.html" scrolling="auto">
3. noresize attribute
By default, frames can be resized by the user regardless of the frameset rows and cols attributes you define. Add the noresize attribute to the <frame> tag if you want to block resizing. Usage example: <frame src="filename.html" noresize>
4. marginheight="pixels" attribute
Number of pixels above and below a document within a frame. Different browsers have different margin defaults. It confirms the appearance of your frames in the target browsers. Usage example: <frame src="filename.html" marginheight="0">
5. marginwidth="pixels" attribute
Number of pixels to the left and right of a document within a frame. Different browsers have different margin defaults. It confirms the appearance of your frames in the target browsers. Usage example: <frame src="filename.html" marginwidth="5">
Adding some style
Chances are that once you have your frames set up you will want to customize each frame's appearance. Cascading style sheets make it easy to manage the overall appearance of your whole frameset. If you are unfamiliar with cascading style sheets, check the Resources section for a helpful article.
When using a style sheet, apply the default style to the frame with the most changes. This way you do not have to continually reference the style sheet class in all your tags (<body> versus <body class="nav">). Then define a class (BODY.nav, where"nav" is the class) for each frame that remains constant or has little change (for example, a banner or site navigation). This makes it easy to alter the overall appearance of your whole frameset by changing colors or adding background images with just one file.
Listing 5 shows the style sheet that was used with the sample Web pages in this article. Each frame's HTML file links in this style sheet and references the appropriate class.

Listing 5. Sample cascading style sheet to use with frames
                

/* Frames sample cascading style sheet */
/* BANNER FRAME STYLE */

BODY.banner {font-family: Arial, sans-serif;background-color: #006699;color:
#FFFFFF;}
/* NAVIGATION FRAME STYLE */

BODY.nav {font-family: Arial, sans-serif;background-color: #99ccff;color:
#000000;}
/* CONTENT FRAME STYLE FOR PAGE CONTENT */

BODY {font-family : Arial, sans-serif;background-color : #FFFFFF;color:
#000000;}


Now you know enough to be popping frames up all over the place. I really enjoy working with frames because they're easy to maintain, they create a user-friendly environment, and above all they tend to reduce Web page reloading. I hope you find frames to be as useful as I have.


Partner site : online news

Top 8 Tips to Increase Infolinks Earnings

Here is the post with top 8 tips to increase Infolinks earnings. I started with Kontera in-text ad network and disappointed with their payout amount. Switched to Infolinks later and making decent income from them with my current traffic.
Tips to Increase Infolinks Earnings
Since Infolinks ads are not like Google adsense ad blocks, it will be a good combination to use both products to monetize a blog. CTR is high, but eCPM is less compare to Google adsense.

Here are the Top 8 Tips to increase Infolinks earnings from my experience.

1. Dotted Line
I was using dotted line and pretty happy with the performance. Recently, Infolinks suggested for double line ads, so they can publish high paying ads. I’m not sure how much its true. I tried it for 10 days, unfortunately, it did not work for me.
Again I changed to dotted line, then my Infolinks earnings started to grow.
Tips to Increase Infolinks Earnings
The above real example is with same amount of traffic.
The key point is, dotted line increased the CTR rate which gave some income increase.
2. Two Colors will work better.
Ad color is very important to get good CTR. You can try two colors to test and settle with the best result color.
a) Blog links color
Change the ad color to your blog’s link color. Definitely this will confuse your readers, at the same time increase the CTR. So, you must decide which one is important and work according to it.
b) Blue ad color
If you are not happy with the first option, then change the ad color to blue. This will work with any blog theme. Blue is the common link color on internet and everyone used to that. You can get possible good number of clinks on blue color link ads, which will increase the CTR and Infolinks earnings.
3. Number of Ads
Do not set it either very less or high numbers. If you have long articles then less number of ads will not cover the whole post. On other hand small posts will irritate your readers with high number of ads.
Also, setting up maximum number of ads will reduce the eCPM by displaying low quality ads, where you will be wasting your CTR. If you like to set maximum number of ads, then write keyword rich long articles.
4. Proper Category
Select the proper category related to your blog content, this will help to display very related and interested ads for your readers. It helps to get high payout ads and increase the CTR.
Tips to Increase Infolinks Earnings
5. Write Keyword Rich Posts
When your posts are having rich keywords related to your blog category, then possibly you will get high paying ads. For example,
“ My OS XP crashed during the installation on my PC” can be written as,
“ My Operating System Windows XP crashed during the installation on my Intel Computer”
Some tech keywords in second sentence, like “Operating System”, ‘Windows XP” and “Intel” will display some worthy Infolinks ads.
6. Related Tags
This point must increase Infolinks earnings very well. Infolinks study says, 30% revenue improvement possible by related tags above the fold on each post.
I don’t use this on my blog, because I’m focusing on Google adsense above the fold, which is performing well. I do not want to add Infolinks related tags and confuse my readers or take away adsense clicks.
related tags
7. Do not display ads in Header, Sidebar and Footer
Since you don’t have control on ad locations, this feature helps to stop displaying ads on header, sidebar and footer texts. To get high CTR and increase Infolinks earnings, it’s always better to display ads in post content only. The users will be concentrating on this area initially.
Add the below codes at the top and bottom of each wordpress element.
Above code in wordpress theme file will display ads on specific area only.
8. Organic Traffic
This is not only for Infolinks, but for all ad networks.
Who clicks the ads on a website?, Mostly its a new visitor who comes via search engines. Concentrate on SEO, unique and new contents to attract more search engine traffic to increase Infolinks earnings.
In my experience Infolinks is the best in-text ad network. Good support and payments on time. Using Infolinks with Google adsense will return decent monthly blog income.
Do share your thoughts about these 8 tips to increase Infolinks earnings, if you have more tips I missed here, please share.
Happy Blogging.


Partner site : online news